arc(point1,point2,angle1,angle2)
arc
.x1
.x2
.y1
.y2
.a1
.a2
.l
.dx
.dy
.p1
.p2
Draws a smooth curve between two points that will never go outside the imaginary lines drawn at the given angles.
Mathematically, this is a quadratic Bezier curve, and you can find more information on it here.
first point of an arc second point of an arc angle at the first point angle at the second point
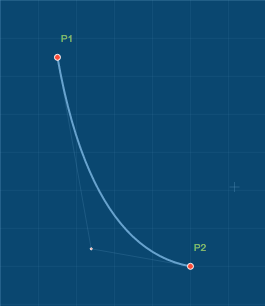
You can use mathematical equations, variables and size constants when defining coordinates of the points, or the angles. E.g. the arc in the example in the right can be described in the following ways:
If the name of an arc is not set in code, the default name is formed as A_firstpoint_secondpoint. E.g. an unnamed arc between points P1 and P2 will get name A_P1_P2 (first line of code).
Names of points can be substituted with function point(x,y). In this case it is mandatory to specify the name of the future arc, as there are no point names to create it automatically (second line of code).
After an arc is created, you can get its properties by using the following syntax:
.a1 - angle at the first point with the horizontal .a2 - the angle at the second point with the horizontal .l - the length of the arc .p1 - the first point .p2 - the second point .x1 - x coordinate for the first point .y1 - y coordinate for the first point .x2 - x coordinate for the second point .y2 - y coordinate for the second point .dx - difference of x coordinate values between the first and the second points .dy - difference of y coordinate values between the first and the second point
Just like line, arc has direction from the first point to the second point.
You may be wondering why it is important to pay attention to angles and set them mathematically, rather than just moving the control point of the curve around.
In pattern making you most always work with shapes that will have to be connected to one another with a seam. When a seam is done, what you want to see is a smooth edge above the seam, and not a pointing corner. Working with angles lets you design the shapes in such a way that they are connected at the right angles to other lines, or curves, that will later become a seam.
Let us look at the following example of code:
Arc A_P1_P3 starts at direct angle to the line between points P1 and P2, and ends at a direct angle to the line between points P3 and P4. The thin straight lines going above the arc show the angles, at which the arc is drawn. The tiny point shows intersection of the two angles, the so called “control point” for the curve.

Please note how properties of implied lines are used in the last line of code (in bold). Translated into human language, the last line of code means:
Draw a smooth curve from P1 to P3. Start drawing at 90 degrees to the imaginary line between P1 and P2, and finish drawing at 90 degrees to the imaginary line between P3 and P4.
If we then attach this piece to another shape with a straight corner, the edge will be smooth, no kink or bump, or corner at the seam. We may even sew the piece along long edges, and the upper edge will be smooth all along as well.
Important: While arcs are comparatively easy to design, they should be used with caution. The system will always look for intersection of two angles, to use as control point, and if there’s none, this function will return a straight line. This is especially important to check for when automatically grading your test patterns across multiple sizes.
We also recommend watching this video for more information on arcs.
Mathematically, this is a quadratic Bezier curve, and you can find more information on it here.
Function parameters
Usage
You can use mathematical equations, variables and size constants when defining coordinates of the points, or the angles. E.g. the arc in the example in the right can be described in the following ways:
arc(p1,p2) arc1=arc(point(10,10),point(50,70)If the name of an arc is not set in code, the default name is formed as A_firstpoint_secondpoint. E.g. an unnamed arc between points P1 and P2 will get name A_P1_P2 (first line of code).
Names of points can be substituted with function point(x,y). In this case it is mandatory to specify the name of the future arc, as there are no point names to create it automatically (second line of code).
Object properties
After an arc is created, you can get its properties by using the following syntax:
Just like line, arc has direction from the first point to the second point.
You may be wondering why it is important to pay attention to angles and set them mathematically, rather than just moving the control point of the curve around.
In pattern making you most always work with shapes that will have to be connected to one another with a seam. When a seam is done, what you want to see is a smooth edge above the seam, and not a pointing corner. Working with angles lets you design the shapes in such a way that they are connected at the right angles to other lines, or curves, that will later become a seam.
Let us look at the following example of code:
p1=point(15,22)
p2 = point(30,70)
line1=line(p1,p2)
p3=point(55,22)
p4=point(40,70)
line2=line(p3,p4)
arc(p1,p3,[p1:p2].a1+90,[p3:p4].a1+90)
Arc A_P1_P3 starts at direct angle to the line between points P1 and P2, and ends at a direct angle to the line between points P3 and P4. The thin straight lines going above the arc show the angles, at which the arc is drawn. The tiny point shows intersection of the two angles, the so called “control point” for the curve.
Please note how properties of implied lines are used in the last line of code (in bold). Translated into human language, the last line of code means:
Draw a smooth curve from P1 to P3. Start drawing at 90 degrees to the imaginary line between P1 and P2, and finish drawing at 90 degrees to the imaginary line between P3 and P4.
If we then attach this piece to another shape with a straight corner, the edge will be smooth, no kink or bump, or corner at the seam. We may even sew the piece along long edges, and the upper edge will be smooth all along as well.
Important: While arcs are comparatively easy to design, they should be used with caution. The system will always look for intersection of two angles, to use as control point, and if there’s none, this function will return a straight line. This is especially important to check for when automatically grading your test patterns across multiple sizes.