spread ((object1,....objectx),inner,outer,angle1,angle2,(newobject1,...newobjectx)
spread
This operator enables you to apply tapered spread to the listed objects.
* Can be point, line, arc, curve, circle, path. Multiple objects should be united into one path.

In tapered spread on paper, a pattern piece is usually cut into multiple stripes, and then these stripes are spread apart to obtain more flared shape. The ends of the stripes along the inner side stay together, while the ends of the stripes along the outer edge move apart at the same distance. The sides of the pattern piece remain of the same shape and length.
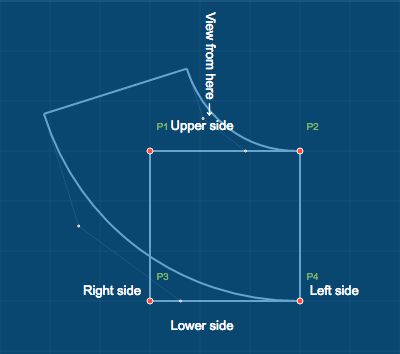
Function spread emulates this process automatically. To better understand how it works, imagine cutting your piece into stripes, and placing it so that the inner side of the pattern piece faces you (see below).
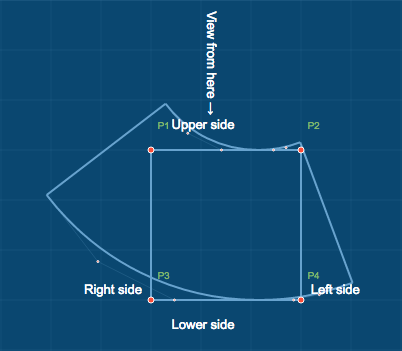
Now you can pull one side of the pattern piece to the left, and the other side to the right. It is important to spread out the stripes evenly. It is desirable to avoid edgy contours on the resulting inner and outer sides, and the software will smooth these for you. In the picture below you may see the red and green smooth curves that will be the result of applying this function. It is important to keep the inner edge of the spread of the same length, as most likely it will then be sewn to another pattern piece. This is also taken care of and you can always be sure that the resulting inner path (in green) is exactly of the same length as the length of the inner side of the original piece.


Syntax of this function is somewhat more difficult than for the other ones.
For example in the following line of code:
Once again, the last parameter works as follows:
Function parameters
- list of the objects tracing the contour of the piece you want to spread, in brackets and separated by commas
- the name of one of the listed objects that will be used as the inner part of spread *
- the name of one of the listed objects that will be used as outer part of spread *
- the angle, at which you wish to spread the objects to the left, as viewed from the inner side towards lower side
- the angle, at which you wish to spread the objects to the right, as viewed from the outer side towards lower side
- (optional) list of new objects in brackets, separated by comma OR name suffix for new objects in double or single quotation marks
* Can be point, line, arc, curve, circle, path. Multiple objects should be united into one path.

Usage
In tapered spread on paper, a pattern piece is usually cut into multiple stripes, and then these stripes are spread apart to obtain more flared shape. The ends of the stripes along the inner side stay together, while the ends of the stripes along the outer edge move apart at the same distance. The sides of the pattern piece remain of the same shape and length.
Function spread emulates this process automatically. To better understand how it works, imagine cutting your piece into stripes, and placing it so that the inner side of the pattern piece faces you (see below).

Now you can pull one side of the pattern piece to the left, and the other side to the right. It is important to spread out the stripes evenly. It is desirable to avoid edgy contours on the resulting inner and outer sides, and the software will smooth these for you. In the picture below you may see the red and green smooth curves that will be the result of applying this function. It is important to keep the inner edge of the spread of the same length, as most likely it will then be sewn to another pattern piece. This is also taken care of and you can always be sure that the resulting inner path (in green) is exactly of the same length as the length of the inner side of the original piece.


Syntax
Syntax of this function is somewhat more difficult than for the other ones.
- The order of the objects in the first parameter should be given in clockwise order. It is better to start with the inner object. It should be followed by the objects considered to be “left”, then by the object to be used as outer side, and then by the objects considered to be “right”. You may use multiple objects for left side and right side. However you can use only one object as inner side, and only one object as outer side. Use minus sign to change direction if required (see also path).
- If you wish to mention complex contour for the inner side, you need to unite it into one complex path. The inner side can be referred to with only one name. Same goes for outer side.
- After you have finished listing your objects in the first parameter, you need to re-write the name of the object that is to be used as inner side again, in the second parameter. So you will actually mention the name of the inner object twice in the same function, and this is okay.
- Same goes for the object to be used as outer side.
- Names of the resulting objects, or suffixes, work in exactly the same way, as for functions move, mirror, rotate, scale. In case you decide to name the new objects manually, the number and the order of the new objects in the last parameter should be exactly the same, as the number and order of the original objects in the first parameter.
For example in the following line of code:
spread((curve1,line1,line2,curve2,line3,line4),curve1,curve2,30,10,”n”)- The object curve1 will be used as inner side as its name is mentioned again in the second parameter of the function.
- The object curve2 will be used as outer side as its name is mentioned again in the third parameter of the function.
- The objects line1 and line2 are mentioned between inner and outer objects, so they are considered to be on the “left” side of the future spread.
- Objects line3 and line4 are mentioned between outer and inner objects, so they are considered to be on the “right” side of the future spread.
- The suffix “n” in the last parameter means that a set of new objects will be created for the spread piece. In this new set of objects curve1n will correspond to curve1, line1n will correspond to line1, etc. The original objects will stay.
- The only corresponding objects that will have different lengths are curve2 and curve2n (the outer sides). All other corresponding objects will have equal lengths, however their position is likely to be different.
Once again, the last parameter works as follows:
- Not mentioned at all - you’ll get only the spread objects with the same names.
- Suffix in quotations - the original objects stay, and the new objects are automatically named with this suffix at the end of the name of the original object (“n” suffix: curve1 -> curve1n)
- Names listed in brackets - the original objects stay, the spread objects get the listed names.